I recently moved from an agency specialising in building Drupal sites to one which is platform-agnostic, and uses all variety of technologies. As my team was not very familiar with Drupal, I started writing some documentation on setting up locally, installing Drush and commonly used modules, and some other stuff so everyone could get up and running quickly.
I’ve modified it to be even more beginner-friendly, for people who’ve never built websites before. This is sort of opinionated so feel free not to follow along exactly.
The basic technology stack
As with most content management systems, Drupal has some system requirements in order to run, commonly known as a technology stack. This simply means you have to install a bunch of things before installing Drupal. The most common stack for running Drupal is: Apache, MySQL and PHP, or AMP stack.
You can choose to install each of these components separately on your machine, or you can download a software bundle that comes with all of them. XAMPP is very popular because it’s cross-platform.
Some Windows users go with WAMP and some Mac users use MAMP. All of them generally provide the same functionality, but each have their own pros and cons. I chose to install all my components separately, but if you don’t want to do that, just go with a software bundle.
Apache
Apache is the recommended web server for running Drupal. A web server is a program which accepts requests from clients, like browsers, and responds to those requests. It’s like going to a store and asking the shopkeeper for a can of peas. The shopkeeper will check his inventory and if he has any, he’ll hand you the can, if not, he’ll tell you he doesn’t have any.
To find out more about Apache, you can read An Introduction to Apache by Diana Eftaiha. You are free to use other web servers, like Nginx or Hiawatha, because Drupal works on any web server that supports PHP.
MySQL
Drupal also requires a database server, the recommended one being MySQL. Similar to the web server, a database server is a program which provides database services to other programs (like your browser). A database is like a neatly organised filing cabinet, and the database server is like the secretary in charge of all those documents.
The secretary should only takes requests from authorised personnel, for security reasons. This is why MySQL requires you to have a user name and password to log into the system. By default, MySQL does not come with a graphical user interface (GUI).
It is definitely possible to manage your database from the command line alone, but most people install a GUI to make things easier. I use Sequel Pro, but that’s only for Mac users. A popular choice is phpMyAdmin, which allows you to handle database management via the browser. MySQL workbench is another database management software which is cross-platform.
PHP
PHP is a server-side scripting language which allows web pages to serve up content dynamically. When we install PHP on a server, we are actually installing an engine which interprets the PHP code on your web page.
Continuing with the secretary example above, it’s as if you have a request but it’s written in Chinese, and the secretary doesn’t understand Chinese. Installing PHP is like introducing a translator, to this mix, so the translator will interpret your Chinese request to the secretary so she can understand exactly what you’re requesting.
There are many different server-side scripting languages, like Java, Ruby, Python and so on. They are simply different languages, like Chinese, Spanish and French.
Regardless of the option you choose, follow the instructions provided by the software manufacturer to install your software bundle of choice on your machine. If you're on a Mac and feeling adventurous, these are the resources I used to set up my development environment:
- OS X 10.10 Yosemite Local Development Environment: Apache, PHP, and MySQL with Homebrew
- Using Dnsmasq for local development on OS X
- The Perfect Web Development Environment for Your New Mac
Installing all these programs alone is not the end of it. These programs, specifically the Apache server and the MySQL server, must be running in order for everything to work. If you chose to go with a software bundle, there will be an option to start the servers.
If you’re just starting out, you may tend to forget to start the servers, especially if you’ve restarted your machine. Just keep that in mind if your development site refuses to load. If, for some reason, your MySQL server isn’t running, whatever GUI database management program you’re using won’t load your database either.
Here are some tutorials with screenshots covering how to set up a local Drupal site on your machine for XAMPP, MAMP and WAMP.
- XAMPP Tutorial: How to Use XAMPP to Run Your Own Web Server
- Using MAMP for local Drupal development
- How to install Drupal 7 on WAMP
Must-have tools
Admittedly, we developers love our tools. But if something can streamline your workflow and reduce your development time, why not? Don’t worry, this is not a long list, there are only two tools we really need. Git and Drush.
I’ve already written about these two tools and how to install them in a previous post about developing Drupal sites as a team. You can skip straight to the parts on installing Drush and installing Git.
Installing Drupal locally
- Download the latest stable version of Drupal from Drupal.org
- Extract the
.zipfile into your localhost directory and set up however you normally do a new local site. The common default alias used for your local environment is localhost, or 127.0.0.1, so we’ll be referring tohttp://localhostfor this example. - Navigate to the sites/default folder and make a copy of the default.settings.php file. Rename this file settings.php. Set the permissions for this file to writeable. You can do that with the following command.
chmod 666 settings.phpYou could also right-click the file and change the permissions from there, if you wanted to. Drupal will change the permissions to 444, and this is essential to keeping your site secure.
- Depending on what you use to manage databases, create a new mySQL database. You should have a user name and password which you set up when you installed MySQL on your system earlier. These credentials have to be entered when you install Drupal via the browser interface in the next steps.
- On your browser, navigate to the root of the site, in this case,
http://localhost.- You will be redirected to the
install.phppage. Select Standard and continue.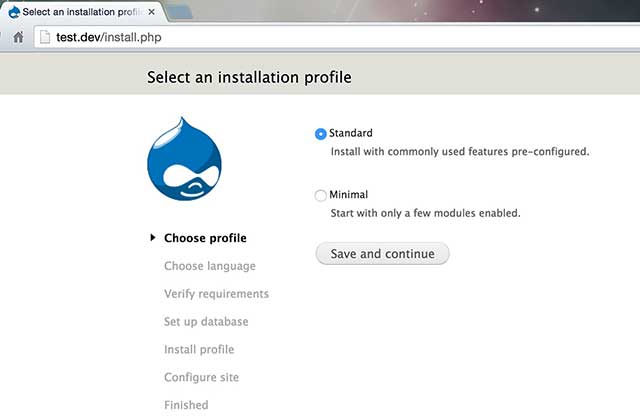
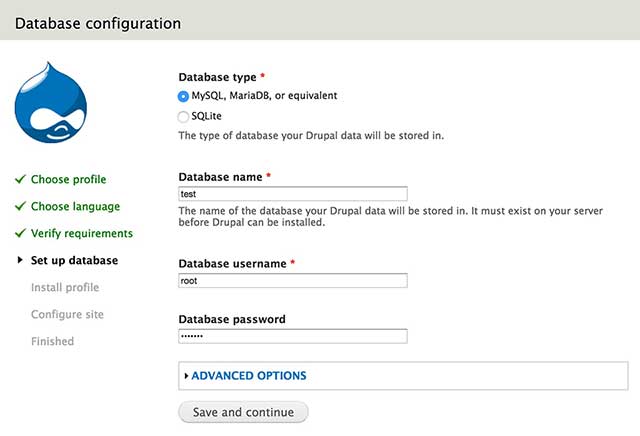
- Choose the default language and click next. For the database setup, enter the name of the database you created earlier, with your MySQL credentials. The advanced options can be left as default.
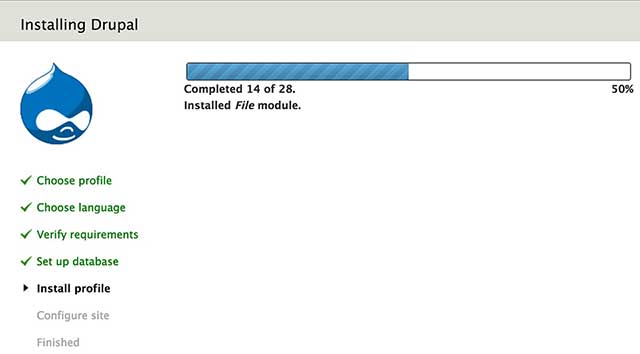
- Drupal should start installing.
- Set up the user 1 account. This account is the superadmin account which can access everything on the site.
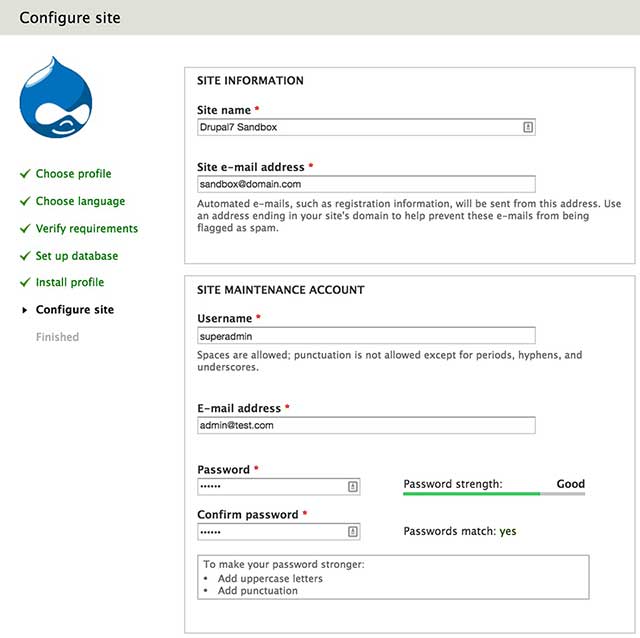
- Your site should be successfully set up.
- You will be redirected to the
You may also need to develop multiple sites concurrently on your machine, and this will require more steps to setup that I will not cover here, but you can check out the following articles to point you in the right direction.
- How to use Apache Virtual Host to run multiple local websites on Windows
- Running Multiple Sites in MAMP
- How to run multiple websites on XAMPP on Windows
Initial module installation
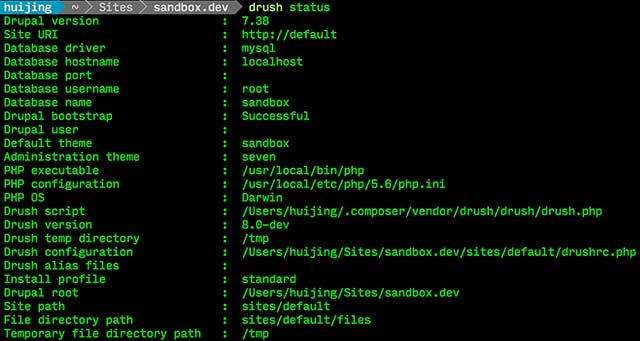
There are a number of modules that are so regularly used that they are default installs for every Drupal site I build. With Drush installed, you can easily install all these modules from your command line. To double check that Drush is installed correctly on your system, navigate to the root of your Drupal installation and run:
drush statusYou should see something like this:
The modules are as follows:
- Administration menu -> A better version of the administration toolbar that ships with Drupal
- Devel -> Helper module for development. Allows use of the dpm() function, which is the equivalent of console.log() in Javascript, dummy content generation and so on.
- Views -> Used for displaying the content on the site in all manner of configurations
- Ctools -> Dependency for views
- Token -> For using placeholders in content, urls, etc.
- Pathauto -> The standard for automatic path aliasing
- Display suite -> For adding advanced field configuration and layout control for node pages (and other entities)
- Libraries -> An API module for modules, allows for better management of external libraries
- Date -> Adds a date field type to Drupal
- Smart trim -> Allows for better management of summary content displays
- Registry Rebuild -> To rebuild the registry (a list of PHP classes and the files they go with)
Download and enable them by using the following command:
drush en admin_menu devel views views_ui ds ds_ui ctools token pathauto date libraries smart_trim registry_rebuild -yIf you want to select the module version, then it'd be better if you used this command:
drush dl admin_menu devel views ctools token pathauto date libraries smart_trim ds registry_rebuild --selectThis is by no means a definitive list of default modules to install. Every developer will have their own list of go-to modules as part of the site setup process. These are just some suggestions for you to start off with if you’ve never built Drupal sites before.
In addition to installing and enabling modules, I will also disable a few of Drupal's core modules. Again, this is a purely optional step. I find the overlay interface for site configuration rather annoying. The default admin toolbar is a bit limited for my liking as well, so I use the Administration menu (mentioned above) instead. Run this command to disable both:
drush dis overlay toolbar -yOther modules will be installed depending on the requirements of the site. The guiding principle of building Drupal sites is to limit the amount of custom code written. Module selection is an integral part of building a Drupal site.
If the particular functionality is relatively niche, it makes sense to examine the usage statistics of the module, the number of open issues it has and if there are any critical bugs.
The good thing is that the community often writes patches to fix bugs, so Drupal.org is a valuable resource throughout the development process. Another place to get help with Drupal issues is Drupal Answers, which is basically Stack Overflow for Drupal.
Additional developer-friendly tweaks
Add the following three lines to your settings.php file.
error_reporting(E_ALL);
ini_set('display_errors', TRUE);
ini_set('display_startup_errors', TRUE);
This turns on error reporting, which is extremely helpful when developing. Otherwise, you will just end up with a white screen and not know what’s wrong. However, when it comes to deploying your site to a live production environment, these lines should be removed.
Wrap-up
Every developer has their own preferred workflows and processes, and this is mine. Hopefully there are some bits you find helpful and can incorporate into your own Drupal development workflow.