Update: There’s a newer post that covers the gulp setup for theming Drupal 8 which highlights a few changes from this post. Don’t worry, the changes are rather minor and most of this post is still relevant.
I still remember the first Drupal 7 theme I built. It was for the Singapore Gastric Cancer Consortium website, and at the time I barely knew my way around HTML and CSS. I used the Zen theme as my starter theme, and unknowingly wrote my CSS in .scss files without realising the distinction.
I was a little bit confused to why I needed to install a software called Codekit to make everything work but was too busy trying to get the theme up and running to worry about it at the time.
Let’s talk about that thing called Sass
After I finished up with that project, I took the time to understand exactly what was going on. That’s when I learned what Sass was. Sass, like CSS, is a stylesheet language. It was developed as part of the HAML markup language, but has since grown into its own.
Sass was invented by Hampton Catlin in 2006. Natalie Weizenbaum, the primary designer and developer of Sass, and Chris Eppstein are the main contributors to the Sass language. The full Sass documentation can be found here.
Sass extends what CSS can do, by introducing useful features such as variables, nesting, mixins and so on. Browsers, however, only understand CSS so the Sass files have to be compiled into CSS for it to serve its purpose.
Sass files come in two different syntaxes, Sass and SCSS, both are currently supported but SCSS is the primary syntax. SCSS is exactly the same as CSS, so renaming any .css file to .scss works perfectly fine.
Sass originated as an open-source project built in Ruby. You can check out the source code here. There are many ways you can get up and running with Sass, either from a GUI application or simply the command line.
The official documentation for installing Sass is pretty comprehensive. The gist of all this is, in order to use Sass in your projects, the Sass files have to be compiled into CSS files first. Dan Cederholm wrote a great article about Why Sass on A List Apart. He describes how Sass simplifies and streamlines the stylesheet authoring process.
Personally, the Sass functionalities I make use of most are variables and mixins. As well as the occasional for-loop. If you want to see a true Sass pro, Hugo Giraudel is your man. He does a lot of amazing things with Sass and you should check out his blog and all his various projects.
And that other thing called gulp
Officially, gulp is a build system. When I first heard of all these tools, like Grunt and gulp, I didn’t understand what they were. Terms like task-runner, build tools, streams and so on just flew over my head.
The first article I ever read on task-runners was Grunt for People Who Think Things Like Grunt are Weird and Hard by Chris Coyier. Honestly, I didn’t get it. But it’s totally my problem and not his (he’s awesome).
A fellow front-end developer tried to explain to me the benefits of Grunt, but at the time, there was nothing that I needed from Grunt which Codekit couldn’t do. So I left task-runners alone, and went about my own way.
Earlier this year, I started doing a lot of HTML, CSS and Javascript experiments, so I came up with my own extremely bare-bones boilerplate, consisting of a 20-line HTML5 template file plus a styles.css file and a scripts.js file, both of which are blank.
During these experiments, I found myself pressing ⌘-⇧-R at an alarming rate. Specifically I was doing ⌘-S (save file), ⌘-tab (switch to browser), ⌘-⇧-R (reload browser). And so, Browsersync. Thing is, if you google “Browsersync development”, the first result is Browsersync + Gulp.js.
I had heard that gulp was easier to understand that Grunt, but was still sceptical, until I read the first tutorial. I actually understood what was happening almost immediately ( ノ^.^)ノ゚.
In a nutshell, when we do front-end development, there are certain actions or tasks that we do repeatedly. Like the aforementioned furious browser-reloading. Sometimes, we also use Sass, which needs to be compiled. When we write Javascript, best practice implores us to concatenate and minify our scripts (for production).
Lots of stuff to take care of. Rather than have to do all that manually, task-runners like Grunt and gulp can do them automatically whenever we save our working files. So that’s what everyone is talking about when they say automating your workflow.
Getting gulp on your system
Node.js
gulp is based on Node.js. Node.js is an open source Javascript run-time system, in other words, it’s a way for your computer to execute Javascript code. You can read this introduction to Node.js article to find out more about it.
The bottom line is, you need to install Node.js on your computer. The most direct way to do this is to download and run the installer from the official website’s downloads page. This approach works for both Windows and Mac.
Now if you’re on Linux, the assumption is you by default already know how to get Node.js on your system. Nah, just kidding. Joyent has a great guide on installing Node.js and NPM for a variety of Linux distributions.
As a Mac user, I use Homebrew to handle all my development-related packages. Makes life easy when you can brew install almost all the things. To use Homebrew, you’ll need to install Command Line Tools first.
xcode-select --installA software update window will pop-up and ask if you want to install the tools now. Just click Install and agree to the Terms and Conditions. The package is around 150mb (I think) and will download and install by itself. Once that's done, install Homebrew.
ruby -e "$(curl -fsSL https://raw.githubusercontent.com/Homebrew/install/master/install)"You can check that everything is running correctly by running:
brew doctor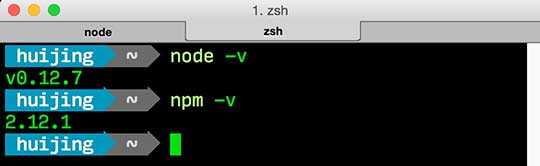
gulp
I don’t think most people care, but according to the FAQ, gulp is always lowercase, except for on the logo. But anyway, the next step is installing gulp.
npm install gulp -gThe -g flag installs gulp globally on your system, allowing it to be used as a command line utility, even outside of node projects. However, you will still need to install gulp locally in your project folder. gulp will always look for a locally installed gulp to pass control to. This is actually makes deployment and dependency management much easier.
gulp-ify your Drupal theme
If you’re just starting out with Drupal theming, you can read my previous post on exactly that right here. The setup for this workflow is going to be different from the typical gulp tutorials you see on the web. Because Drupal has it’s own quirks, you know.
Setting up the package.json file
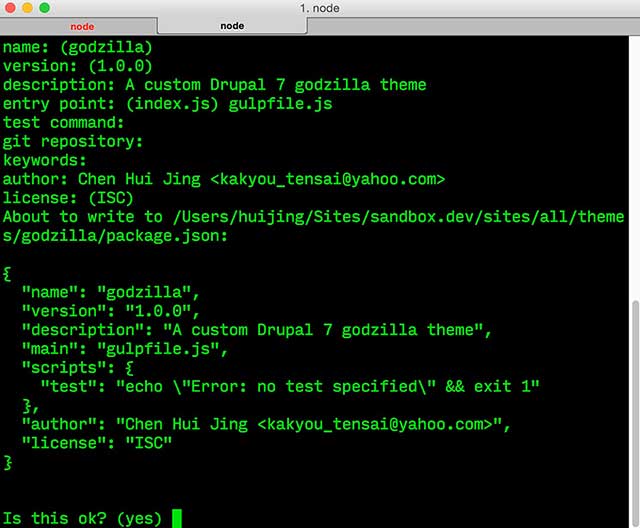
Navigate to the root of your Theme folder and initiate a new node project.
npm init
Most of the prompts are pretty intuitive, and if you leave any of the fields blank, default values will be used. You can always change those values later. Set the entry point to gulpfile.js , and add information like the git repository if you wish.
❗ Important: Preventing segmentation fault
To prevent triggering a segmentation fault when running Drush, we need to add a script to the package.json file that will remove all .info files from the node_modules folder.
Each node package has it’s own .info file and it turns out that Drush thinks that they are all part of Drupal. Unfortunately, they are not in a format that Drush recognises and hence everything blows up badly. The .info files are not necessary for gulp to run properly so it’s safe to remove them.
If you had generated your package.json file by using npm init , locate the section called "scripts": , and replace the line:
"test": "echo \"Error: no test specified\" && exit 1"with this line instead:
"postinstall": "find node_modules/ -name '*.info' -type f -delete"Also, create a file called .npmrc in the root of your theme folder with the following contents:
unsafe-perm = trueReferences to this issue:
- How do I prevent Drupal raising a segmentation fault when using a Node.js theming workflow?
- Drupal Drush Segmentation Fault 11 Error: Avoiding the Rabbit Hole (This one’s a good read)
Adding plugins to the package.json file
Under normal circumstances, adding gulp-plugins to your project is a straight-forward affair on the command line. Simply use the command:
npm install PLUGIN_NAME --save-devThe --save-dev flag adds gulp, as a dependency, to your package.json file. All the subsequent gulp plug-ins we install locally will also go into this package.json file. For this case, however, we’ll add the plugins we need directly to the package.json file.
Since gulp is simply a tool that helps automate tasks, we need to decide what tasks we want gulp to do for us. For example, I use Sass in my Drupal themes, so one of my tasks will be to compile Sass. This particular workflow I’m describing does not come with minification though.
I made the decision to handle performance optimisation through Drupal itself. Drupal 7 comes with the option of aggregating and compressing CSS, and aggregating JS. Even though Drupal 7 does not minify JS natively, there is a module called Minify that uses Google’s Closure Compiler for compression. This workflow I’m building really just automates the actual theming process (building templates, writing styles etc.).
Here's the list of plug-ins needed and what they will be used for:
- gulp - Still have to install gulp locally
- gulp-sass - To compile Sass into CSS
- gulp-autoprefixer - To add vendor-prefixes based on the latest specifications
- browser-sync - To live-reload the browser
- gulp-shell - To run drush for clearing caches
Update: gulp-shell is apparently an anti-pattern that has ceased to be supported from gulp 4 onwards. Use child-process instead. The package.json and gulpfile.js has been updated accordingly.
This is what the final package.json looks like:
{
  "name": "godzilla",
  "version": "1.0.0",
  "description": "A custom Drupal 7 godzilla theme",
  "main": "gulpfile.js",
  "devDependencies": {
    "browser-sync": "^2.8.1",
    "gulp": "^3.9.0",
    "gulp-autoprefixer": "^2.3.1",
    "gulp-sass": "^2.0.4",
  },
  "scripts": {
    "postinstall": "find node_modules/ -name '*.info' -type f -delete"
  },
  "author": "huijing",
  "license": "ISC"
}
Install all the things
Run the following command in the root of your theme folder, which is where your package.json file should be:
npm installYou’ll see a whole lot of stuff going on in your terminal, but when all is said and done, you’ll have a node_modules folder in your theme folder.
This installation allows the script to prevent segmentation fault we added earlier to run as the modules are installed. For future gulp-plugins, you may have to run a script to remove their .info files.
Make sure that node_modules is added to your .gitignore file because we do NOT want to commit those files. We only commit the package.json file and the gulpfile.js file. Anyone who clones the project will need to run npm install to get the project up and running.
Writing the gulpfile.js
- Load the required plug-ins
Therequirestatement tells Node.js to refer to thenode_modulesfolder, find the package stated in parenthesis and pass that into each respective variable in the list. These variables will be used when we write our various gulp tasks.
var gulp        = require('gulp'),
   browserSync = require('browser-sync'),
   sass        = require('gulp-sass'),
   prefix      = require('gulp-autoprefixer'),
   cp          = require('child_process');
Creating tasks
We’ll start off by creating a task to compile Sass into CSS. We’ll also use Autoprefixer to add vendor-prefixes to the file before it gets output as a CSS file in thecssfolder. Finally, we want the new styles to be injected into the browser (no more ⌘-⇧-R〈( ^.^)ノ). Just check that your file paths are correct./** * @task sass * Compile files from scss */ gulp.task('sass', function () { return gulp.src('scss/styles.scss') // the source .scss file .pipe(sass()) // pass the file through gulp-sass .pipe(prefix(['last 15 versions', '> 1%', 'ie 8', 'ie 7'], { cascade: true })) // pass the file through autoprefixer .pipe(gulp.dest('css')) // output .css file to css folder .pipe(browserSync.reload({stream:true})) // reload the stream });We'll also want a task for our favourite drush command,
drush cc all. Clearing cache is the Drupal equivalent of "Did you turn it off and on again?". I don't know about you but if I had a dollar for every time I ran this command, I'd be sipping Piña coladas 🍸 all day on a beach in the Caribbean 😎 by now. If you aren't using Drush, you really should. Here’s an earlier post on how to get set up with Drush./** * @task clearcache * Clear all caches */ gulp.task('clearcache', function(done) { return cp.spawn('drush', ['cc all'], {stdio: 'inherit'}) .on('close', done); });After clearing the cache, we'll also want to reload the page.
gulp.task()accepts three parameters, the task name (which is a string), an array of tasks to be completed before the current task can begin, and the function that holds the logic of the task. The array is an optional argument, so it's common to see gulp tasks with only two parameters defined. Here I want the'clearcache'task to complete before reloading the page./** * @task reload * Refresh the page after clearing cache */ gulp.task('reload', ['clearcache'], function () { browserSync.reload(); });We want the
'sass'task to trigger when we've made changes to our .scss files and the'clearcache'task to trigger when we've made changes to our template files. So we write another task to watch those files and trigger their respective tasks when changes have been made./** * @task watch * Watch scss files for changes & recompile * Clear cache when Drupal related files are changed */ gulp.task('watch', function () { gulp.watch(['scss/*.scss', 'scss/**/*.scss'], ['sass']); gulp.watch('**/*.{php,inc,info}',['reload']); });Browsersync is much more than just a tool to reload your browser. The sync portion of the name comes from the fact that you can synchronise interactions across multiple browsers. So if I set up a bunch of devices whose browsers are pointing to browser-sync’s external access URL, I can control all these browsers at the same time. Scrolling, clicking, you name it. The documentation is pretty comprehensive, and it’s a good idea to familiarise yourself this extremely useful tool.
You will need to install the browsersync Drupal module for this to work.
Then go to Appearance > YOUR_THEME and check Enable Browsersync, and you should be all set. On the gulpfile.js side of things, set the proxy to whatever alias your Drupal site is on. For the domain, just set it to localhost:3000, which is the Browsersync default. When you need to do testing on other devices, replace the IP address with the one shown in your Terminal window after running gulp.drush en browsersync -y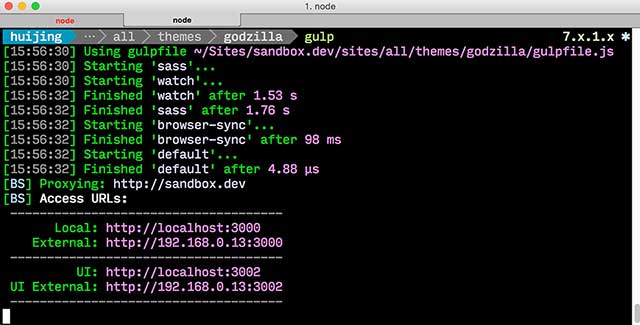
The task to launch the Browsersync server should look something like this:
/**
 * Launch the Server
 */
gulp.task('browser-sync', ['sass'], function() {
  browserSync.init({
    // Change as required
    proxy: "sandbox.dev",
    socket: {
      // For local development only use the default Browsersync local URL.
      domain: 'localhost:3000'
      // For external development (e.g on a mobile or tablet) use an external URL.
      // You will need to update this to whatever BS tells you is the external URL when you run Gulp.
      //domain: '192.168.0.13:3000'
    }
  });
});
Lastly, we're going to put everything together and write the task that runs all the things. This task will launch the Browsersync server and watch our files for changes. Each individual gulp task can be called with the command
gulp TASK_NAME, by naming this task'default', we can run it by just typinggulp./** * Default task, running just `gulp` will * compile Sass files, launch Browsersync & watch files. */ gulp.task('default', ['browser-sync', 'watch']);My
gulpfile.jsin its entirety looks like this:var gulp = require('gulp'), browserSync = require('browser-sync'), sass = require('gulp-sass'), prefix = require('gulp-autoprefixer'), cp = require('child_process'); /** * Launch the Server */ gulp.task('browser-sync', ['sass'], function() { browserSync.init({ // Change as required proxy: "sandbox.dev", socket: { // For local development only use the default Browsersync local URL. //domain: 'localhost:3000' // For external development (e.g on a mobile or tablet) use an external URL. // You will need to update this to whatever BS tells you is the external URL when you run Gulp. domain: '192.168.0.13:3000' } }); }); /** * @task sass * Compile files from scss */ gulp.task('sass', function () { return gulp.src('scss/styles.scss') .pipe(sass()) .pipe(prefix(['last 15 versions', '> 1%', 'ie 8', 'ie 7'], { cascade: true })) .pipe(gulp.dest('css')) .pipe(browserSync.reload({stream:true})) }); /** * @task clearcache * Clear all caches */ gulp.task('clearcache', function(done) { return cp.spawn('drush', ['cc all'], {stdio: 'inherit'}) .on('close', done); }); /** * @task reload * Refresh the page after clearing cache */ gulp.task('reload', ['clearcache'], function () { browserSync.reload(); }); /** * @task watch * Watch scss files for changes & recompile * Clear cache when Drupal related files are changed */ gulp.task('watch', function () { gulp.watch(['scss/*.scss', 'scss/**/*.scss'], ['sass']); gulp.watch('**/*.{php,inc,info}',['reload']); }); /** * Default task, running just `gulp` will * compile Sass files, launch BrowserSync & watch files. */ gulp.task('default', ['browser-sync', 'watch']);
Up and running with Gulp
While you're in the root of your theme folder, run the command:
gulpYour terminal should look like the last screenshot above, and your browser will have a new window open with the URL pointing to http://localhost:3000. There will be a brief notification in the right corner that says Connected to BrowserSync. Now, when you write your styles, they will magically update in the Browser without you having to do anything.
Wrap-up
I learnt a lot throughout the process of trying to use gulp as part of my theming workflow and also spent a good amount of time googling issues. And hopefully some of the stuff I mentioned will save you some troubleshooting time when you set up your own theme to use gulp.